In this mindful texture and shading exercise, we’ll draw some simple patterns that can create texture and shading.
Drawing simple lines can be really relaxing and it’s not difficult to do. Did you know that simple patterns can give a little extra to your drawing?
So in this exercise, we relax our minds by coloring circles and drawing repetitive lines to get in a flow. However, at the same time, you’ll learn some basic drawing techniques as well. Win-win, I’d say.
These are patterns that anyone can draw. As long as you’re able to hold a pen, you’re good to go. Just try it!
Leave perfection at the door and just experiment with these lines and shapes.
Please let me know if this mindful texture and shading exercise helped you relax, I’d love to know.
If you have any questions about this exercise, please leave a comment below and I’ll help you.
You can find a small video of this exercise on my Instagram @thecreativecooldown
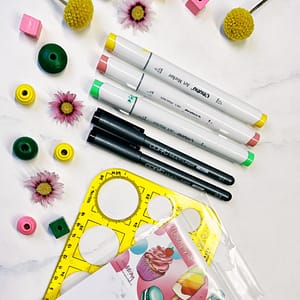
Supplies used:
Bristol paper (Handletteringdoenwezo), alcohol markers (ohuhu), fineliner no. 0.1, 0.3 (Copic), circle maker (M+R).
Alternative supply suggestions:
You can use a regular pen or a pencil to draw the lines for this exercise. If you want to add color, use whatever you have, such as crayons, markers, and watercolor. Even if you only have a pencil, just try it. You can simulate different colors by using different shades of grey.
If you don’t have a circle maker, you can use any round object to make your circles, such as a glass.
Instructions
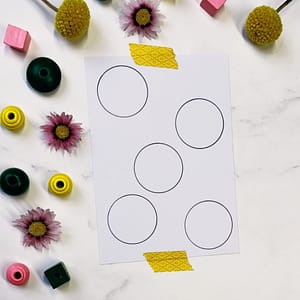
1. Before you start, slowly breathe in and out a few times to get more relaxed. Grab your circle maker or a round object and draw 5 circles on your page.

2. Now it’s time to color your circles. Choose colors that calm you or make you feel good. Try to make repetitive flowy lines as you color your circles. This will help you relax. Take your time, there’s no need to rush. Just enjoy coloring.

3. Next, we’ll fill our first circle with some lines. It will create a great effect if you vary between long and short lines. They don’t have to be perfectly straight but can be playful. The less space you leave between your lines the darker your circle will become. You can also use this as a shading technique. Then you’ll draw the lines closer together on the sides where it’s supposed to be the darkest.

4. Let’s fill our second circle with looped lines. They will almost like like random scribbles. Because of the loops, you will create a texture that looks like sheep’s wool. The closer you draw your loops the darker that area will become. Again, this can be also used to add shading to your drawing.

5. It’s time to fill our third circle. This time we’ll fill it with patches of lines. Draw 5 lines in one particular direction, this is your first patch. Then you will connect another 5 lines, but you draw them in a completely different direction than your first patch. Make sure all the patches that are touching each other differ in direction. If you draw your lines closer together, you can make your patches darker, if you keep more space between your lines, your patches will be lighter. Again, a fun shading technique.

6. For our fourth circle, we’ll use a technique called cross-hatching. You’ll first draw some vertical parallel lines. Then you’ll cross those lines with horizontal or diagonal lines. Use this to fill your circle. The closer you draw these lines the darker that area will become. In the photo above, I have experimented with the closeness of the lines. The lines on the left side of the circle are a lot closer together, making that part darker.

7. Lastly, we will fill the last circle with dots. This is a technique that is also called stippling. You use dots to add texture and shading. At the bottom of the circle, I have added a lot more dots than at the top. Now, this circle has some shading on the bottom.
You have finished the mindful texture and shading exercise. Well done!
If you liked this exercise, you might like my Mindful circle lineart exercise as well.