We’re all about finding easy, creative ways for you to unwind and let go of some of the mom-life stress, especially as the holiday season approaches.
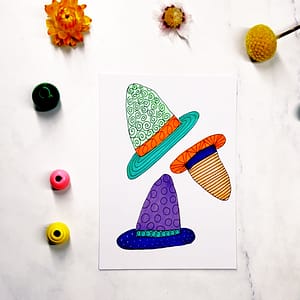
And with Halloween right around the corner, here’s a simple and fun exercise you can dive into: drawing patterned witch hats! This little project is perfect for a few minutes of me-time or even something you can do with your kids as a relaxing Halloween craft.
Why Pattern Drawing is a Perfect Self-Care Moment
In the rush of motherhood, we often forget to pause and give ourselves a mental break. Pattern drawing, even something as simple as adding dots or lines, can be incredibly grounding. Here’s why it works so well for mental health:
- Focus on the Process, Not the Outcome
When you draw repetitive patterns, your mind naturally shifts into a more meditative state. There’s no pressure to create a masterpiece. Instead, you’re just focusing on drawing that next swirl or line, letting your worries drift away for a bit. - Gentle, Playful Creativity
Drawing these hats with simple patterns brings a sense of playfulness—something that’s often missing in our to-do lists and mom duties. It’s a little Halloween fun without the mess of carving pumpkins or organizing costumes. - Reduces Anxiety and Increases Mindfulness
The repetitive act of drawing patterns has been shown to reduce anxiety and increase mindfulness. As you add dots or lines, you’re bringing your mind back to the present moment, giving yourself a break from any racing thoughts.
Have fun with this witch hat drawing exercise! Please let me know if you’ve tried it; I would love to see it.
You can find a small video of this exercise on my Instagram @thecreativecooldown
Supplies used:
Bristol paper (BeCreativeShop), Alcohol markers (Ohuhu), fineliner (Ohuhu), fineliner (Steadtler).
Alternative supply suggestions:
You don’t need to be an artist or have fancy tools. Just grab whatever you have—pens, markers, colored pencils, or even crayons.
Step-by-Step Guide: Patterned Halloween witch hat drawing
Step 1 – Start with the hat outline
Begin by drawing a few witch hats on your page. Don’t worry about making them perfect! A witch hat can be a little quirky—just sketch a tall triangle for the cone, then add a circle or oval around the base for the brim.
Step 2 – Add some color
Choose a few Halloween-inspired colors. Think purples, oranges, greens, and dark blues!
Fill in your hats with these colors. It doesn’t need to be precise; let the colors flow freely, embracing any imperfections as part of the charm.
Step 3 – Create your patterns
Now for the fun part—patterns! Inside the triangle (the main part of the hat), fill it with one type of pattern.
It could be swirls, dots, zigzags, or tiny stars. For the brim, add a different pattern, like stripes or tiny polka dots. Switching up patterns keeps it interesting and adds depth to each hat.
Try filling a whole page or just a few hats if you’re short on time. The repetition of drawing these shapes and patterns helps shift your mind away from daily worries and lets you focus on the calming movement of your hand on the paper.
How to Involve Your Kids (If You Want To!)
This is a great exercise to do solo for some quiet time, but it’s also simple enough to involve your kids.
Set up some markers or crayons, and let them draw their own hats, choosing their own colors and patterns. They’ll love getting into the Halloween spirit, and it’s a low-pressure way to bond creatively.
A Halloween-themed break
Whether you have five minutes or fifty, this witch hat drawing exercise is a simple way to take a break, enjoy some Halloween-themed creativity, and give your mind a little rest.
So grab a piece of paper, pick your favorite fall colors, and let the stress fade away with each line, swirl, and dot. You’ve earned it, mama!
Happy drawing!
You might also like my Halloween spider web drawing exercise if you enjoyed this one.


